Spectrum TimeClock Installation Guide
Spectrum TimeClock is available as hosted application, or as a licensed application running from servers of selected firms with more than 250 employees. Find out more about web based Spectrum TimeClock.
Installation Prerequisites
You will need to know the following information before you can install Spectrum TimeClock on your web and database servers.- What is the name of the Microsoft SQL Server database server that you will install to?
- What is the name of the Microsoft SQL Server database that you will install to? The default is "TimeClock"
- What is the logon name to use for the Microsoft SQL Server database installation? You will need the administrator logon name and password if you plan to have the Windows Install program do the complete installation. Alternately, your administrator can create an empty database and logon for you.
- What is the password for that logon?
- What is the name of the Microsoft IIS virtual directory you want to use for the TimeClock application code?
- What http port does your web server use? The default is port 80.
1 - Automatic Spectrum Time Clock Installation
1.1 Installation Details
Installation of the Spectrum Time Clock program is done in two parts. The installation of the
web ASP code is handled by a "Windows Installer" application. The database installation
is handled by a "Database Builder" application that is run from the "Windows Installer" application,
or run manually.
Both the Windows Installer (SETUP.EXE) program and the Database Builder (DataBaseBuilder.exe) require the Microsoft .NET Framework version 1.1 or better. The TimeClock application itself does not require the .Net Framework.
1.2 Installation Options
You have several options as to how you install the Spectrum Time Clock application.
- You can choose to have the installation program completely install the application (both web and database portions) automatically.
- You can choose to manually install the web application and use the "Database Builder" to completely build the database.
- You can choose to manually install the web application, manually create the database, and use the "Database Builder" to only create the database tables, stored procedures, and user defined functions.
1.3 Automatic Program Installation
The application installation program can install both the web application and
the database onto your Microsoft IIS Server and Microsoft SQL Server. You will
need administrative access to both the IIS Server and the SQL Server if you plan
to have it do a full installation.
One drawback of having the installation program handle the whole installation is that you will have to give it the "system-administrator" password to use for database access. For this reason, we recommend that you manually create the database as described in section 2 of this guide.
You will need to have the Microsoft .NET Framework loaded on your server in order to run the Setup.exe program. You may be prompted to download a copy and run it. We have included a copy of version 1.1 of the redistributable framework as "\Install\dotnetfx.exe" on the distribution CDROM. After installation, you should go to Windows Update to download any service packs for the .Net Framework.
To have the installation program do all installation tasks, insert the distribution
CDROM into the CD player on your server. Then run the "\Install\Setup.exe" program.
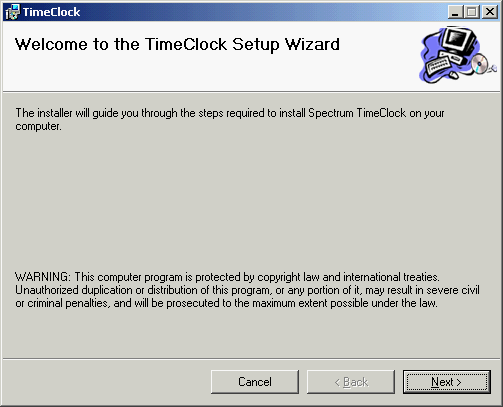
You will see a dialog that looks like the screen below.
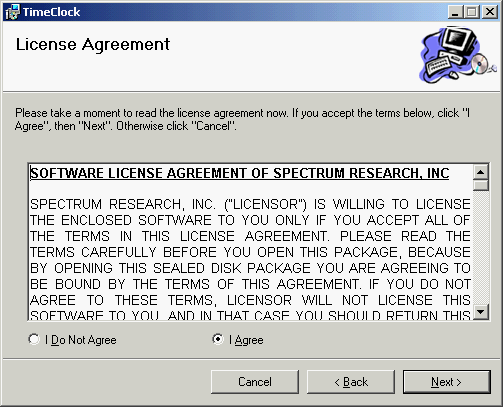
Next, you must read and agree to the license agreement. When you have read it and agree,
click on the "I Agree" radio button, and click the "Next" button.
Next, you need to tell the Windows Installer program if you want it to run the Database Builder
application after it has installed the TimeClock application code on your web server. Check the
checkbox to have it do this. Click on the "Next" button when you have entered the virtual directory
name.

You must now enter the name of the IIS Virtual directory that you want the TimeClock
application to run from. You can also specify a different port number for the application
to run from - however we have only tested port 80.
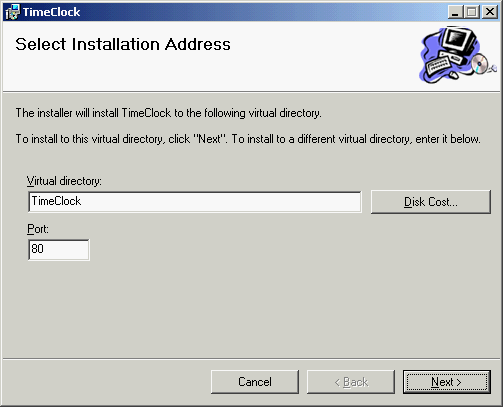
Press the "Next" button to confirm your installation settings.
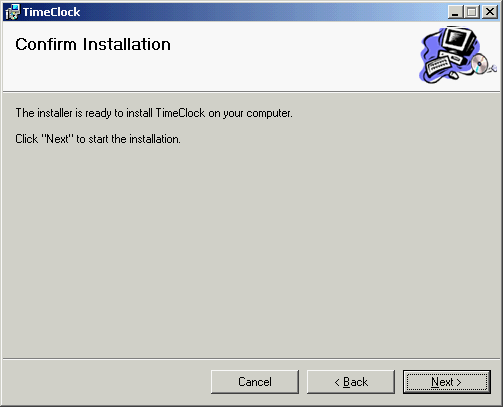
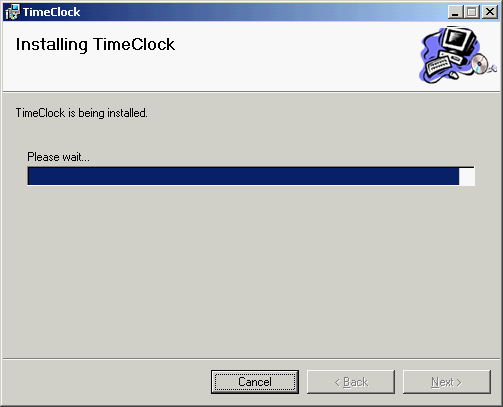
The installer will now create the virtual directory on your web server, and copy the
application files into place.
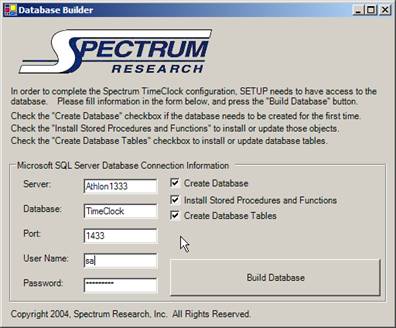
After installing the application files into place, the Windows Installer will run the Database Builder. You must enter information about your server as follows.
- Type in the name of the database server in the "Server" input box.
- Type in the name of the database that you have created the application in the "Database" input box.
- Type in the communication port for your SQL Server database installation. This is 1433 by default.
- Type in the logon user name in the "User Name" input box.
- Type in the logonís password in the "passwordí input box.
- Make sure that the "Create Database" checkbox IS checked.
- Make sure that the "Install Stored Procedures and Functionsí check box IS checked.
- Make sure that the "Create Database Tables" checkbox IS checked.
- Click on the "Build Database" button.
2 - Manual Spectrum Time Clock Software Installation
2.1 Installation TasksThe installation of the Spectrum Time Clock software involves the following tasks.
- Making a new virtual directory on the web server for the ASP code.
- Copying the ASP and other files to the web server.
- Modifying conn.asp to include the database server name, the logon name and password.
- Creating the SQL Server 2000 database.
- Adding a logon for the database.
- Creating the database tables.
- Adding critical data into the database tables.
- Installing the stored procedures.
- Installing the user defined functions.
If you have full control over your servers, you can run the installation program from your web server as a single task. The major drawback to installing the software and database this way is that step #5 above wonít be performed. You will have to configure the software to use your database serverís 'sys-admin' user and password if you have the install software perform all installation tasks.
If you donít want Time Clock use your 'sa' logon and password, or you donít have full control over your database server, you will have to install the software code separately from the database.
2.2 - Typical Database Installation Scenarios
There are several different scenarios for Time Clock database creation and installation.
- You have full system-administrator control over your database server and want Time Clock to use the 'sa' logon (not recommended).
- You have full system-administrator control over your database server and want to create the new database for Time Clock, as well as a new logon to access the database (recommended).
- The database has already been created for you, and you had no control over the database name, or the logons that have access to the database (most common situation for 'over the internet installation').
The Database Builder portion of the installation software can create the new Time Clock database on your database server. Again though, manually creating the database will give you more control over how it is created. Your I.T. department may have also created an empty database with a new logon for you.
The Database Builder can still be used to create the database tables, stored procedures and user defined functions, even if you donít have it create the database.
2.3 - Database Creation
Skip this section if you plan to use the Spectrum Time Clock installation
software for all installation tasks.
To manually create and install the Time Clock database, do the following.
- Run the SQL Server Enterprise Manager.
- Open your server's tree hierarchy and right click on "Databases".
- Click on the "New Database..." menu.
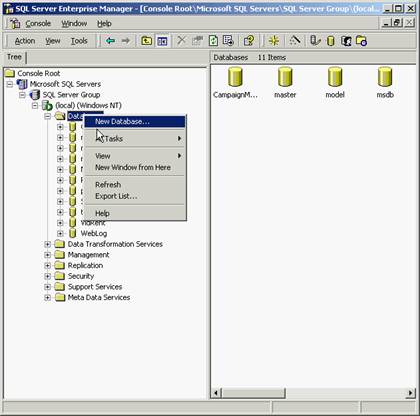
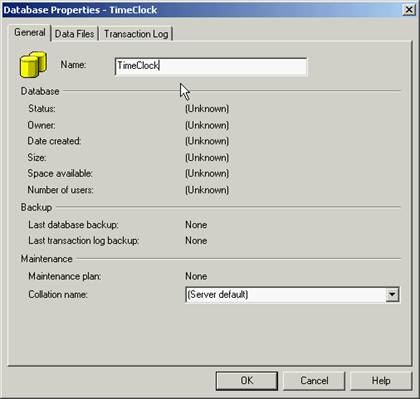
- Next, you must name the database. From the "Database Properties" screen (as seen below), type in the database name as "Time Clock", or any other name you want to use. You can also click on the "Data files" and "Transaction Log" tabs to customize the database setup.
2.4 - Adding Database Users
Skip this section if you plan to use the sys-admin database logon to access the
database (not recommended), or plan to use the Spectrum Time Clock installation
software for all aspects of the software install.
You must now create a new user 'logon' for the database. You can also use the 'system-administrator' logon, but this is not recommended. To create the new logon, do the following.
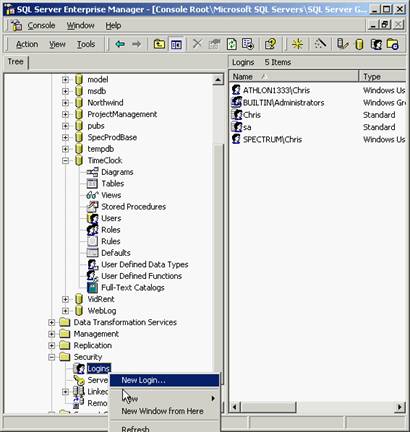
- Open the "Security" branch in the SQL Server Enterprise Manager as seen in the figure below.
- Right click on "Logins".
- Click on the "New Logon" menu.
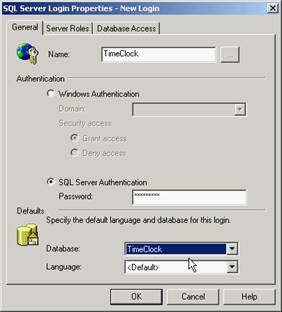
- Next, you must type in the name of the new logon. We use the name "TimeClock" in the example below, but you can use any logon name.
- Clock on the 'SQL Server Authentication' radio button.
- Set the password for the logon.
- Set the default database to use for the new logon. It should be "TimeClock", or whatever you named the database.
- Now click on the "Database Access" tab for the new logon. From that tab, you must set the databases that the logon can access. Scroll down and click on "TimeClock", or whatever you named the database.
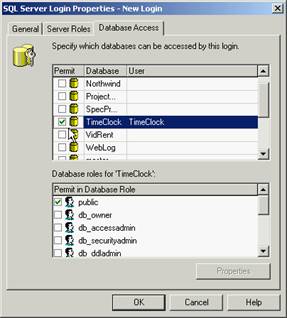
- Now click on "OK". The empty database has been correctly created.
2.5 - Database Installation
Now that an empty database has been created, all of the database tables, stored
procedures, user defined functions, and critical data have to be added to the
database.
The DatabaseBuilder program (DatabaseBuilder.exe) does all of these tasks by executing the CreateTimeClockDatabase.SQL script to add the database tables, and by adding the data, stored procedures, and user defined functions separately. The Database Builder program can be found in the "\Install\User's Application Data Folder" folder on the installation CDROM.
If you want to install the database as manually as possible, you can run the CreateTimeClockDatabase.SQL from the Microsoft SQL Server 2000 Query Analyzer directly. However, this wonít install the user stored procedures, user defined functions, or any of the critical data needed to run the program. The Database Builder must be used for these installation functions.
To have the Database Builder perform the database creation, you must perform the following tasks.
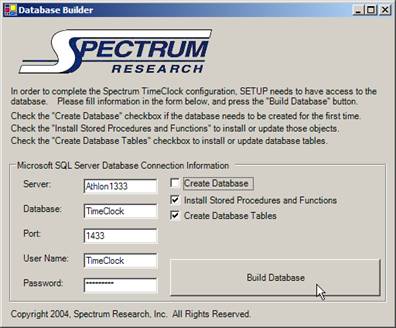
- Run DatabaseBuilder.exe
- Type in the name of the database server in the "Server" input box.
- Type in the name of the database that you have created the application in the "Database" input box.
- Type in the communication port for your SQL Server database installation. This is 1433 by default.
- Type in the logon user name in the "User Name" input box.
- Type in the logonís password in the "passwordí input box.
- Make sure that the "Create Database" checkbox is NOT checked.
- Make sure that the "Install Stored Procedures and Functionsí check box IS checked.
- Make sure that the "Create Database Tables" checkbox IS checked.
- Click on the "Build Database" button.
- Confirm that you want to create a new database or overwrite an existing database. Note: If your database already has data in it, all data will be overwritten.

- Write down the Time Clock system administrator username and password.
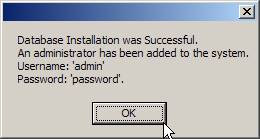
- Click on OK, and terminate the Database Builder application.
- That's it! You should be able to point your web browser to the directory that you installed the TimeClock software on and see the TimeClock face. Press the Login button to log in and start managing users.
